WebOS Signage
Description
WebOS LG professional panels with an integrated player (System on Chip).
Initial setup
In the case of the first start-up of the device (the device has not been used anywhere before), a setup wizard should appear (a greeting with a question about choosing a language, country, and time zone).
First time you turn on the device (new device)
When you turn on the device for the first time, you need to configure basic parameters such as language, operating mode, and playback method using the setup wizard.
'For panels based on WebOS 2.0, it is also necessary to turn off the shutdown after 4 hours of operation:'
- Hold the "settings" button until a notification appears in the upper right corner of the screen
- Dial 0000 and press the "OK" button.
- In the window that appears, select "Signage Setup".
- Select "Auto Power Off" and indicate "OFF".
Before start
'Before starting the SmartPlayer app, make sure that you are using the latest / recommended version of the firmware.'
'WebOS 2.0 / WebOS 3.0'
On the remote control, press the "Home" button, select System Information / Information.
'WebOS 3.2 / WebOS 4.0'
On the remote control, press the "Home" button, select the tile S / W Version
Be sure to set the correct time or use the NTP Server.
NTP Configuration:
- Press Settings button on remote
- General -> Time & Date
- Select Set Automatically
[Alternative] Manual installation of the application:
- On the remote control Quickly enter the combination of buttons 8080 + "OK" button. 'On WebOS2.0 and 3.0' hold the "settings" button until a notification appears in the upper right corner of the screen 8080 + "OK" button
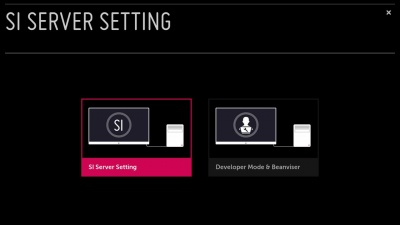
- Select EZ SETTINGS -> SI Server Settings.
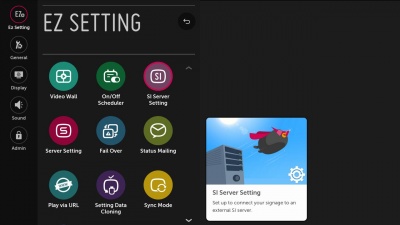
- Select SI Server Settings.
- Fill in the parameters as shown in the image, replacing the application address with the representative of SmartPlayer provided to you. 'Important!!! AutoSet must be set to off. If this is not done, the application will not be able to update from the SmartPlayer server. Actual forwebOS4 and higher. '
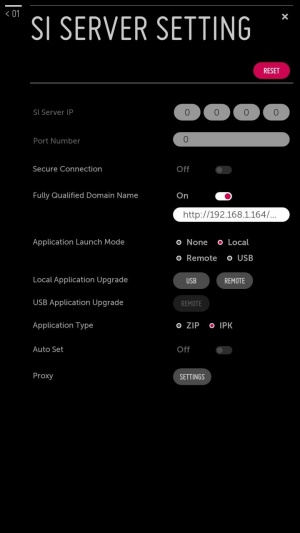
- Select Local Application Upgrade: Remote.
- Wait for application update
- Reload prof. panel.


2. Массовая установка приложения с помощью ПО Beanstaller
При подключении устройств и компьютера администратора в общую сеть оптимальным вариантом будет использовать ПО Beanstaller. Beanstaller обычно используется при массовой установки (более 20 устройств за раз) приложения. Beanstaller - позволит максимально оперативно прописать настройки для установки приложения с компьютера администратора. ПО Beanstaller можно запросить у представителя SmartPlayer.
3. USB установка приложения с помощью USB stick и файла scap_installation.json
Данная установка используется при установки приложения по USB FLASH.
- Запишите в корень флешки файл scap_installation.json полученный от представителя SmartPlayer.
- Вставьте флешку в проф. панель.
- Перезагрузите устройство.
Приложение будет скачано, установлено и запущено после перезагрузки.
Сброс панели до заводских настроек
- На пульте нажимаем SETTINGS.
- В открывшемся меню выбираем вкладку Admin
- Переводим переключатель из положения OFF, в положение ON. Система попросит ввести пароль, по умолчанию 0000.
- Выбираем пункт factory reset - confirm
Если в процессе скачивания и установки возникла проблема обратитесь к соответствующему разделу, с возможными проблемами и способами их решения ЗДЕСЬ.
Обновление прошивки (актуально для WebOS 3, WebOS 3.2, WebOS 4)
- Скачать официальную прошивку на сайте LG или по ссылке предоставляемой представителями SmartPlayer
- Создать на usb флешке папку с именем LG_MONITOR и перенести прошивку в данную папку
- Вставить флешку в панель, зайти в меню пункт General, далее нажимаем сем раз нажимаем цифру 7 на пульте.
- Переходим в меню обновления прошивки, выбираем файл обновления который будем устанавливать
- Нажимаем UPDATE
Важно!!!
- Если вы хотите обновить прошивку на более раннюю версию то перед обновление нужно выключить в меню переключатель Ext. MICOM
