Инструкция по работе виджета событий/en: различия между версиями
Новая страница: «Event Widget User Guide» |
Новая страница: «== '''Widget Description''' == This widget allows users to utilize event functionality across multiple devices simultaneously. That means, if users have several devices/screens, each playing its own stream, a button press on the remote control will trigger the widget to simultaneously start playing the desired event on all three devices, interrupting the current broadcast. After the event playback is complete, the widget stops functioning and the original br...» |
||
| Строка 1: | Строка 1: | ||
== '''Widget Description''' == This widget allows users to utilize event functionality across multiple devices simultaneously. That means, if users have several devices/screens, each playing its own stream, a button press on the remote control will trigger the widget to simultaneously start playing the desired event on all three devices, interrupting the current broadcast. After the event playback is complete, the widget stops functioning and the original broadcasts on the devices resume. | |||
== ''' | == '''Adding the Widget to the Personal Account''' == To add this widget to the personal account, the user must request it from the SmartPlayer support team. It will be provided as a ".zip" archive. [[File:Архив_виджета.png|thumb|center| Example of widget in ".zip" archive format|800px]] | ||
Next, the user must log into their personal SmartPlayer account and go to the "Content" section. [[File:Раздел_контент_личного_кабиента.png|thumb|center| Example of "Content" section in personal account |800px]] | |||
== ''' | In the "Content" section, drag the widget from local storage into the "Content" area. After uploading, the widget will appear in the content list. [[File:Виджет_событий_в_лк.png|thumb|center| Example of widget drag-n-drop upload|800px]] | ||
== '''Widget Setup''' == After uploading the widget to the "Content" section, the user should double-click the widget icon to start the initial setup. This action opens the widget's homepage. [[File:Главная_странциа_виджета.png|thumb|center| Example of widget homepage|800px]] | |||
[[File:Архив_виджета.png|thumb|center| | On the homepage, users can access the widget settings by clicking the gear icon. [[File:Настройка_виджета.png|thumb|center| Example of settings icon|800px]] | ||
== '''Widget Configuration Parameters''' == After entering the widget settings, the user will see two configuration blocks: | |||
[[File:Раздел_контент_личного_кабиента.png|thumb|center| | * Font size and background; | ||
* Button and button group settings. | |||
[[File:Виджет_событий_в_лк.png|thumb|center| | [[File:Блоки_настроек_виджета.png|thumb|center| Example of widget settings blocks|800px]] | ||
== ''' | === '''Font Size and Background''' === This block includes the following parameters: | ||
* Language selection — allows the user to choose from available localizations: Russian, English, Spanish, Portuguese, Kazakh; | |||
[[File:Главная_странциа_виджета.png|thumb|center| | *Font size — allows the user to set font size via value or slider; | ||
*Widget background — allows the user to set the background using a palette; | |||
[[File:Настройка_виджета.png|thumb|center| | *Background image — allows selection of an image from available files in the personal account. [[File:Настройки_фона_виджета.png|thumb|center| Example of background settings|800px]] | ||
== ''' | === '''Button and Button Group Settings''' === This block includes the following parameters: | ||
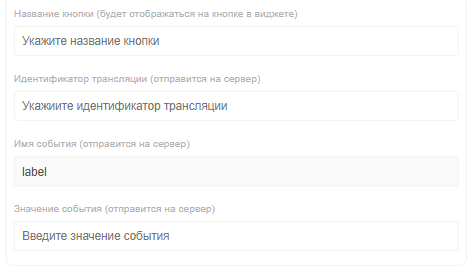
*"Add Button" button — opens a window with the following parameters: [[File:Параметры_кнопки.png|thumb|center| Example of button parameter list|800px]] | |||
*Button name — user must enter the button label; | |||
*Broadcast ID — user must find the desired broadcast, click on it, and copy the "broadcastid" value from the URL; [[File:Идентификатор_транлсяции.png|thumb|center| Example of broadcast ID|800px]] | |||
[[File:Блоки_настроек_виджета.png|thumb|center| | *Event name — the event label known to the server (default and always "label"); | ||
=== ''' | *Event value — the value used when creating the event in the broadcast. It is configured by selecting "server application" and defining it by "payload." Enter the required value in the broadcast. [[File:Работа_с_событиями.png|thumb|center| Example of event value configuration|800px]] {{Note|You can learn more about the trigger-event model [https://wiki.smartplayer.org/index.php/%D0%A2%D1%80%D0%B8%D0%B3%D0%B3%D0%B5%D1%80%D0%BD%D1%8B%D0%B5_%D1%81%D0%BE%D0%B1%D1%8B%D1%82%D0%B8%D1%8F_%D0%B2_%D1%82%D1%80%D0%B0%D0%BD%D1%81%D0%BB%D1%8F%D1%86%D0%B8%D0%B8 here]|warn}} | ||
*"Add Group" button — opens a window with two parameters: [[File:Параметры_кнопки.png|thumb|center| Example of button parameter list|800px]] | |||
* | *Group name — allows the user to create a container for storing grouped buttons; | ||
* | *Add button — the same functionality described above. [[File:Доавбление_групп.png|thumb|center| Example of group configuration parameters|800px]] | ||
* | |||
* | |||
[[File:Настройки_фона_виджета.png|thumb|center| | |||
=== ''' | |||
* | |||
[[File:Параметры_кнопки.png|thumb|center| | |||
* | |||
* | |||
[[File:Идентификатор_транлсяции.png|thumb|center| | |||
* | |||
* | |||
[[File:Работа_с_событиями.png|thumb|center| | |||
{{Note| | |||
* | |||
[[File:Параметры_кнопки.png|thumb|center| | |||
* | |||
* | |||
[[File:Доавбление_групп.png|thumb|center| | |||
<div lang="ru" dir="ltr" class="mw-content-ltr"> | <div lang="ru" dir="ltr" class="mw-content-ltr"> | ||
== '''Завершение настройки виджета''' == | == '''Завершение настройки виджета''' == | ||
Версия от 09:44, 4 сентября 2025
== Widget Description == This widget allows users to utilize event functionality across multiple devices simultaneously. That means, if users have several devices/screens, each playing its own stream, a button press on the remote control will trigger the widget to simultaneously start playing the desired event on all three devices, interrupting the current broadcast. After the event playback is complete, the widget stops functioning and the original broadcasts on the devices resume.
== Adding the Widget to the Personal Account == To add this widget to the personal account, the user must request it from the SmartPlayer support team. It will be provided as a ".zip" archive.

Next, the user must log into their personal SmartPlayer account and go to the "Content" section.

In the "Content" section, drag the widget from local storage into the "Content" area. After uploading, the widget will appear in the content list.

== Widget Setup == After uploading the widget to the "Content" section, the user should double-click the widget icon to start the initial setup. This action opens the widget's homepage.

On the homepage, users can access the widget settings by clicking the gear icon.

== Widget Configuration Parameters == After entering the widget settings, the user will see two configuration blocks:
- Font size and background;
- Button and button group settings.

=== Font Size and Background === This block includes the following parameters:
- Language selection — allows the user to choose from available localizations: Russian, English, Spanish, Portuguese, Kazakh;
- Font size — allows the user to set font size via value or slider;
- Widget background — allows the user to set the background using a palette;
- Background image — allows selection of an image from available files in the personal account.

Example of background settings

=== Button and Button Group Settings === This block includes the following parameters:
- "Add Button" button — opens a window with the following parameters:
Example of button parameter list - Button name — user must enter the button label;
- Broadcast ID — user must find the desired broadcast, click on it, and copy the "broadcastid" value from the URL;

Example of broadcast ID - Event name — the event label known to the server (default and always "label");
- Event value — the value used when creating the event in the broadcast. It is configured by selecting "server application" and defining it by "payload." Enter the required value in the broadcast.

Example of event value configuration You can learn more about the trigger-event model here - "Add Group" button — opens a window with two parameters:
Example of button parameter list - Group name — allows the user to create a container for storing grouped buttons;
- Add button — the same functionality described above.

Example of group configuration parameters


Завершение настройки виджета
После завершения работ по настройке виджета пользователь должен нажать на кнопку «Применить настройки» в правой нижней части экрана.

Далее виджет растянется на весь экран и пользователь должен нажать на кнопку «Сохранить», внизу по центру экрана.

Работа настроенного виджета
Когда виджет будет настроен пользователь увидит на экране созданные кнопки или группы кнопок, при нажатии на которые, с помощью пульта, можно переключать события и возвращать исходные трансляции для проигрывания.
Загрузка и скачивание настроек
В процессе взаимодействия с настройками виджета пользователь может загрузить или выгрузить настройки виджета. Каждое из указанных действий можно сделать с помощью отдельных иконок в интерфейсе виджета. Иконки расположены в виджете снизу по центру.

Тонкости и нюансы в работе виджета
Данный виджет, как и любое решение имеет свои «узкие» места, которые будут обозначены в этом разделе:
- При работе с виджетом пользователь может настроить переключение одного экрана по кнопке с пульта. Событие на этом экране запустится, остальные устройства продолжат проигрывать текущую трансляцию.
Добавление настроенного виджета в трансляцию
Чтобы полностью ознакомиться с работой данной функциональности, пользователю необходимо запустить трансляцию с расписанием и добавить в качестве контента данный виджет. Чтобы ознакомиться с описанными ранее шагами по созданию трансляции и расписания рекомендуется просмотреть следующие статьи из Wikipedia:
Видеоинструкция
Настройка виджета переключения событий
Дополнительная информация
Если данная статья не помогает использовать функционал по назначению или после ее прочтения остаются вопросы можно озвучить данные вопросы в разделе "Обсуждения" вверху страницы.

Также дополнительную информацию можно узнать на странице Как взаимодействовать пользователю с разделом "Обсуждения"
