Инструкция по работе виджета событий/en: различия между версиями
Новая страница: «== '''Widget Description''' == This widget allows users to utilize event functionality across multiple devices simultaneously. That means, if users have several devices/screens, each playing its own stream, a button press on the remote control will trigger the widget to simultaneously start playing the desired event on all three devices, interrupting the current broadcast. After the event playback is complete, the widget stops functioning and the original br...» |
Новая страница: «== '''Completing Widget Configuration''' == After completing the widget setup, the user must click the "Apply Settings" button in the lower right corner of the screen. thumb|center| Example of the "Apply Settings" button |800px Next, the widget will expand to full screen and the user must click the "Save" button at the bottom center of the screen. File:Сохран.png|thumb|center| Example of the "Sav...» |
||
| Строка 23: | Строка 23: | ||
*Group name — allows the user to create a container for storing grouped buttons; | *Group name — allows the user to create a container for storing grouped buttons; | ||
*Add button — the same functionality described above. [[File:Доавбление_групп.png|thumb|center| Example of group configuration parameters|800px]] | *Add button — the same functionality described above. [[File:Доавбление_групп.png|thumb|center| Example of group configuration parameters|800px]] | ||
== '''Completing Widget Configuration''' == | |||
== ''' | After completing the widget setup, the user must click the "Apply Settings" button in the lower right corner of the screen. | ||
[[File:Применение_настрок.png|thumb|center| Example of the "Apply Settings" button |800px]] | |||
[[File:Применение_настрок.png|thumb|center| | Next, the widget will expand to full screen and the user must click the "Save" button at the bottom center of the screen. | ||
[[File:Сохран.png|thumb|center| Example of the "Save" button |800px]] | |||
[[File:Сохран.png|thumb|center| | === '''How the Configured Widget Works''' === | ||
=== ''' | Once the widget is configured, the user will see the created buttons or button groups on the screen. By pressing them with the remote control, events can be switched, and the original broadcasts will resume playback. | ||
== '''Loading and Downloading Widget Settings''' == | |||
== ''' | During interaction with the widget settings, the user can upload or download the widget configuration. Each of these actions can be performed using separate icons in the widget interface. The icons are located at the bottom center of the widget. | ||
[[File:Иконки_загрузки.png|thumb|center| Example of the icons in the widget settings |800px]] | |||
[[File:Иконки_загрузки.png|thumb|center| | == '''Widget Work Specifics and Nuances''' == | ||
== ''' | This widget, like any solution, has its "weak points," which are listed in this section: | ||
* When working with the widget, the user can configure the switching of a single screen using a button on the remote control. The event on this screen will start, while other devices will continue playing the current broadcast. | |||
* | == '''Adding the Configured Widget to a Broadcast''' == | ||
== ''' | To fully explore how this functionality works, the user needs to start a broadcast with a schedule and add this widget as content. To get familiar with the previously mentioned steps on how to create a broadcast and schedule, it is recommended to review the following Wikipedia articles: | ||
* [[Раздел "Устройства"]] | * [[Раздел "Устройства"]] | ||
* [[Раздел "Контент на устройства"]] | * [[Раздел "Контент на устройства"]] | ||
* [[Раздел "Трансляции"]] | * [[Раздел "Трансляции"]] | ||
* [[Раздел "Расписание"]] | * [[Раздел "Расписание"]] | ||
== ''' | == '''Video Instruction''' == | ||
[https://vk.com/video-227547238_456239090 | [https://vk.com/video-227547238_456239090 Setting Up the Event Switching Widget] | ||
== ''' | == '''Additional Information''' == | ||
If this article does not help to use the functionality as intended or if there are any remaining questions after reading, they can be asked in the "Discussions" section at the top of the page. | |||
[[File:Обсуждение_виджета_событий.png|thumb|center| | [[File:Обсуждение_виджета_событий.png|thumb|center| Example of the "Discussions" tab on the wiki page |800px]] | ||
You can also find additional information on the page [[Как взаимодействовать пользователю с разделом "Обсуждения"]] | |||
Текущая версия от 09:49, 4 сентября 2025
== Widget Description == This widget allows users to utilize event functionality across multiple devices simultaneously. That means, if users have several devices/screens, each playing its own stream, a button press on the remote control will trigger the widget to simultaneously start playing the desired event on all three devices, interrupting the current broadcast. After the event playback is complete, the widget stops functioning and the original broadcasts on the devices resume.
== Adding the Widget to the Personal Account == To add this widget to the personal account, the user must request it from the SmartPlayer support team. It will be provided as a ".zip" archive.

Next, the user must log into their personal SmartPlayer account and go to the "Content" section.

In the "Content" section, drag the widget from local storage into the "Content" area. After uploading, the widget will appear in the content list.

== Widget Setup == After uploading the widget to the "Content" section, the user should double-click the widget icon to start the initial setup. This action opens the widget's homepage.

On the homepage, users can access the widget settings by clicking the gear icon.

== Widget Configuration Parameters == After entering the widget settings, the user will see two configuration blocks:
- Font size and background;
- Button and button group settings.

=== Font Size and Background === This block includes the following parameters:
- Language selection — allows the user to choose from available localizations: Russian, English, Spanish, Portuguese, Kazakh;
- Font size — allows the user to set font size via value or slider;
- Widget background — allows the user to set the background using a palette;
- Background image — allows selection of an image from available files in the personal account.

Example of background settings

=== Button and Button Group Settings === This block includes the following parameters:
- "Add Button" button — opens a window with the following parameters:
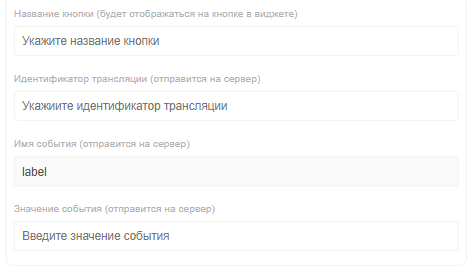
Example of button parameter list - Button name — user must enter the button label;
- Broadcast ID — user must find the desired broadcast, click on it, and copy the "broadcastid" value from the URL;

Example of broadcast ID - Event name — the event label known to the server (default and always "label");
- Event value — the value used when creating the event in the broadcast. It is configured by selecting "server application" and defining it by "payload." Enter the required value in the broadcast.

Example of event value configuration You can learn more about the trigger-event model here - "Add Group" button — opens a window with two parameters:
Example of button parameter list - Group name — allows the user to create a container for storing grouped buttons;
- Add button — the same functionality described above.

Example of group configuration parameters


Completing Widget Configuration
After completing the widget setup, the user must click the "Apply Settings" button in the lower right corner of the screen.

Next, the widget will expand to full screen and the user must click the "Save" button at the bottom center of the screen.

How the Configured Widget Works
Once the widget is configured, the user will see the created buttons or button groups on the screen. By pressing them with the remote control, events can be switched, and the original broadcasts will resume playback.
Loading and Downloading Widget Settings
During interaction with the widget settings, the user can upload or download the widget configuration. Each of these actions can be performed using separate icons in the widget interface. The icons are located at the bottom center of the widget.

Widget Work Specifics and Nuances
This widget, like any solution, has its "weak points," which are listed in this section:
- When working with the widget, the user can configure the switching of a single screen using a button on the remote control. The event on this screen will start, while other devices will continue playing the current broadcast.
Adding the Configured Widget to a Broadcast
To fully explore how this functionality works, the user needs to start a broadcast with a schedule and add this widget as content. To get familiar with the previously mentioned steps on how to create a broadcast and schedule, it is recommended to review the following Wikipedia articles:
Video Instruction
Setting Up the Event Switching Widget
Additional Information
If this article does not help to use the functionality as intended or if there are any remaining questions after reading, they can be asked in the "Discussions" section at the top of the page.

You can also find additional information on the page Как взаимодействовать пользователю с разделом "Обсуждения"
