WebOS Signage
Description
WebOS LG professional panels with an integrated player (System on Chip).
Initial setup
In the case of the first start-up of the device (the device has not been used anywhere before), a setup wizard should appear (a greeting with a question about choosing a language, country, and time zone).
First time you turn on the device (new device)
When you turn on the device for the first time, you need to configure basic parameters such as language, operating mode, and playback method using the setup wizard.
'For panels based on WebOS 2.0, it is also necessary to turn off the shutdown after 4 hours of operation:'
- Hold the "settings" button until a notification appears in the upper right corner of the screen
- Dial 0000 and press the "OK" button.
- In the window that appears, select "Signage Setup".
- Select "Auto Power Off" and indicate "OFF".
Before start
'Before starting the SmartPlayer app, make sure that you are using the latest / recommended version of the firmware.'
'WebOS 2.0 / WebOS 3.0'
On the remote control, press the "Home" button, select System Information / Information.
'WebOS 3.2 / WebOS 4.0'
On the remote control, press the "Home" button, select the tile S / W Version
Be sure to set the correct time or use the NTP Server.
NTP Configuration:
- Press Settings button on remote
- General -> Time & Date
- Select Set Automatically
[Alternative] Manual installation of the application:
- On the remote control Quickly enter the combination of buttons 8080 + "OK" button. 'On WebOS2.0 and 3.0' hold the "settings" button until a notification appears in the upper right corner of the screen 8080 + "OK" button
- Select EZ SETTINGS -> SI Server Settings.
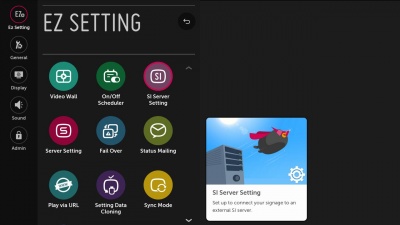
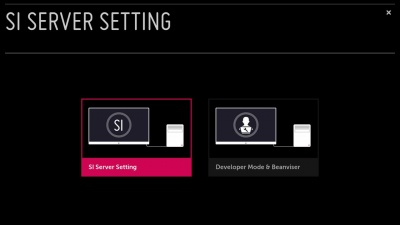
- Select SI Server Settings.
- Fill in the parameters as shown in the image, replacing the application address with the representative of SmartPlayer provided to you. 'Important!!! AutoSet must be set to off. If this is not done, the application will not be able to update from the SmartPlayer server. Actual forwebOS4 and higher. '
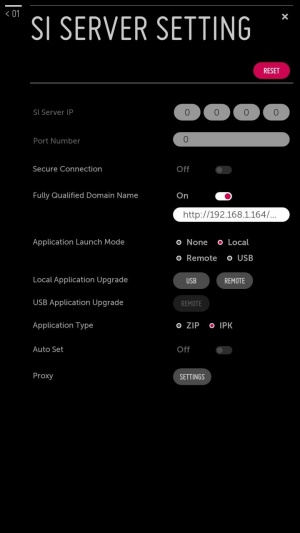
- Select Local Application Upgrade: Remote.
- Wait for application update
- Reload prof. panel.


2nd method Bulk application installation using Beanstaller
When connecting devices and the administrator's computer to a shared network, the best option is to use the Beanstaller software. Beanstaller is commonly used when bulking installations (more than 20 devices at a time) of an application. Beanstaller - will allow you to quickly register the settings for installing the application from the administrator's computer. Beanstaller software can be requested from a SmartPlayer representative.
3rd method. USB install application using USB stick and scap_installation.json file
This setting is used when installing the application via USB FLASH.
- Write the scap_installation.json file received from the SmartPlayer representative to the root of the flash drive.
- Insert the flash drive into the prof. panel.
- Reboot your device.
The application will be downloaded, installed, and launched after the restart.
Reset the panel to factory settings
- On the remote control press SETTINGS.
- In the menu that opens, select the Admin tab
- Turn the switch from the OFF position to the ON position. The system will ask you to enter a password, the default is 0000.
- Select factory reset - confirm
If a problem occurs during the download and installation process, refer to the appropriate section, with possible problems and solutions HERE.
Firmware update (relevant for WebOS 3, WebOS 3.2, WebOS 4)
- Download the official firmware on the LG website or via the link provided by SmartPlayer representatives
- Create a folder on the usb flash drive with the name LG_MONITOR and transfer the firmware to this folder
- Insert a USB flash drive into the panel, go to the menu item General, then press this button seven times, press number 7 on the remote control.
- Go to the firmware update menu, select the update file that we will install
- Press UPDATE
Important!!!
- If you want to upgrade the firmware to an earlier version, before upgrading you need to turn off the Ext switch in the menu. MICOM
